Large format tile includes pieces such as 12×24, 24×48 and 48×48. Full-size porcelain panels take the idea further: many are about 5 by 10 feet, creating large wall surfaces with very few seams. Both need flat substrates, appropriate bonding and planned joints, but handling, ordering and installation methods differ.
This guide helps Kansas City homeowners, designers and builders choose between conventional tile, large tile and panels. It covers shower walls, floor requirements, fireplaces and feature walls: what to specify, how to review a layout and what to settle before material is ordered.
What counts as large format tile
An edge of 15 inches or longer is a useful planning threshold because the published substrate-flatness requirement tightens at that size. A 12×24 piece is therefore large format even though its shorter edge is only 12 inches. This threshold does not make it a gauged porcelain panel; panel classification also concerns the product standard and face area.
Large format tile brings several related but distinct checks:
- Substrate flatness: no more than 1/8 inch variation in 10 feet and 1/16 inch in 24 inches for tile with an edge at least 15 inches. Those are also the published tolerances for gauged porcelain panel substrates. The flatness section explains how this differs from level or plumb.
- Mortar coverage: for conventional ceramic/porcelain tile, CTEF's guidance gives minimum contact of 80% in interior dry areas and 95% in wet areas, with support at edges and corners. The installer checks coverage by lifting freshly placed pieces. A trowel size, clip system or back-buttering step alone does not establish adequate contact. Gauged panels have their own installation procedures and bedding requirements.
- Offset: CTEF's 2025 explanation of ANSI A108.02 uses a maximum 33% offset when the side being offset exceeds 15 inches, unless the tile manufacturer specifies otherwise. A greater offset requires the stated mockup and approval process. This matters because a half-tile offset can put a tile's bowed center next to neighboring low ends.
- Grout width: the same CTEF explanation gives average minimum running-bond joints of 1/8 inch for rectified tile and 3/16 inch for calibrated tile when any side exceeds 15 inches, increased for actual long-edge warpage. These are not universal joint dimensions for every product and pattern. Follow the selected material's requirements and the applicable installation method.
- Lippage: neighboring edges can differ in height. TCNA explains that evaluation includes the applicable installation allowance plus actual inherent tile warpage, not the maximum warpage a product could theoretically have. Joint width, lighting, surface finish and substrate condition also affect perception. Clips cannot flatten a deficient substrate or remove manufactured curvature.
Floor structure is a separate check. For example, LATICRETE's 254 PLATINUM data sheet specifies L/360 for thin-bed ceramic tile, subject to its loads and system requirements. A flat floor is not proof that its framing, subfloor or concrete assembly is suitable. Review the complete system, intended loads and applicable requirements.
What counts as a porcelain panel
TCNA's summary of ANSI A137.3 defines the gauged-porcelain product categories. Its terms are worth knowing because sellers use them loosely:
- Gauged porcelain tile is manufactured to a specific thickness tied to its use. TCNA's summary of the July 2022 edition describes strength criteria for nominal thicknesses of 5.0–6.5 mm (floors, walls and countertops), 3.5–4.9 mm (walls and countertops) and 20 mm and up.
- A tile panel or slab is any unit with at least one square meter of face area, about 10.8 square feet. A smaller gauged unit is a gauged porcelain tile, and ordinary tile isn't covered by this standard at all.
By that definition, a 24-by-48-inch piece (8 square feet) is not a panel, however large it looks. A 30-by-60-inch piece (about 12.5 square feet) crosses into panel territory. Stonepeak Plane 2.0's nominal 5-by-10-foot panel covers about 48.5 square feet; other products differ. The panel sections below focus on that full-size end of the range.
Some products have a fiberglass mesh bonded to the back. Laminam, for example, marks its reinforced versions with a "+" (Laminam 3+, 5+). The mesh changes how the panel handles and which setting methods the manufacturer documents. It doesn't change what the face is made of.
Not everything sold as a slab is porcelain
These materials get grouped together in showrooms and online, but they are different products with different installation methods:
- Porcelain panels and slabs: fired ceramic with very low water absorption. Stonepeak's Plane 2.0 data sheet lists water absorption of 0.5% or less, and Infinity lists 0.05% for one of its products.
- Quartz (engineered stone): crushed quartz bound with resins. It is usually a fabricated countertop material, not a thin wall panel.
- Surfaces marketed as “sintered stone” or ultracompact slabs: these names do not establish a single installation method. Use the specific product's data sheet and approved applications to compare them.
- Solid surface: acrylic or polyester resin with mineral filler. Its makers describe it as softer than quartz and stone and susceptible to heat damage.
- Acrylic and other polymer shower-wall systems: a separate product category with its own fastening and joint systems. Not interchangeable with porcelain panel methods.
- Natural stone slabs: quarried marble, quartzite and other stone. Usually thicker and heavier, with porosity and care needs that vary by stone.
Tile, large-format tile or full-size panels?
Panels aren't the right answer for every wall. Here's how the three options compare on the things that actually affect a project.
| Conventional tile (e.g., 3×12 to 12×12)* | Large-format tile (e.g., 24×48) | Full-size porcelain panels (e.g., nominal 60×120) | |
|---|---|---|---|
| Pieces on a 5×8 ft shower wall (60×96 in.) | 40 (12×12) or 160 (3×12), by area before layout and cuts | At least 5 by area; a simple layout may use 6, before cuts | A 59.06-in. panel cannot span the full 60-in. width in one piece |
| Pattern continuity | Repeats are part of the look | Pattern breaks at every joint | One graphic can cover a whole wall |
| Published substrate flatness | 1/4 in. in 10 ft and 1/16 in. in 12 in. for tile with all edges under 15 in. | 1/8 in. in 10 ft and 1/16 in. in 24 in. | 1/8 in. in 10 ft and 1/16 in. in 24 in. |
| Handling | Smaller individual pieces | Size and weight may require help | Manufacturer guidance calls for team handling |
| Access constraints | Rarely matter | Occasionally | Often decisive: stairs, turns, doors, elevators |
| How it's ordered | Sq ft + overage | Sq ft + overage | Whole panels from a cut plan; offcut is often unusable |
| Sloped shower floor | Easy | Possible with planning | Large panels don't readily slope; floors often use a linear drain or another material |
| Curves, angles, many openings | Handles well | Workable | Every cut is a large-panel cut; complex walls add cost and risk |
| Replacing a damaged piece | Replace a tile | Replace a tile | Replace a whole panel, if matching material exists |
*Tile with any edge 15 in. or longer, such as 12×24, falls under the tighter large-tile tolerance.
Panels make sense when the walls are large and mostly uninterrupted, the pattern continuity is the point, the room is reachable with a panel carried on edge, and the budget covers prep and handling, not just material.
Large-format tile makes sense when you want fewer joints than standard tile but the access is tight, the wall has several openings, or you want a sloped tile floor that matches the walls.
Conventional tile makes sense when the design calls for pattern, texture, mosaics or curves, the room has many angles, or the budget is tight.
Many good projects mix them: panel walls with a coordinating tile floor, or a panel feature wall beside a tiled shower.
Actual sizes, thickness and what each product is documented for
Panel sizes are sold by nominal dimensions. The actual size is what matters for layout.
| Product example | Sold as | Actual face size | Thickness |
|---|---|---|---|
| Stonepeak Plane 2.0 | 60 × 120 in. | 59.06 × 118.19 in. (published inch dimensions) | 6 mm |
| Infinity | Product-specific large-slab formats | Confirm supplied and usable size; documentation includes 1600 × 3200 and 1620 × 3240 mm formats | Confirm selected product |
| Laminam | Formats include 1000 × 3000 / 1200 × 3000 / 1620 × 3240 mm | Confirm usable area and trimming for the selection | Varies by product and backing |
Thickness affects what a product is documented for. Laminam's own application table, for example, lists its thinner products (2+, 3+, 5, 5+) for vertical cladding, and its 12+ and 20+ for kitchen and bathroom tops. A product that's documented for walls isn't automatically documented for a floor, bench top or fireplace hearth. Check the manufacturer's application information for each surface.
Our material selection guide compares Infinity, Laminam and Stonepeak in more detail.
Handling and access
A full-size 6 mm Stonepeak panel weighs about 140 pounds by the manufacturer's published 2.88 lb per square foot. Weight isn't the main difficulty. The panel is about 10 feet long and a quarter-inch thick, so it has to be carried on edge, supported along its length, and kept from flexing or striking a corner. Setting-material guides call for at least two installers. TEC's guide calls for a minimum crew of three. TEC also describes three- or four-person panel handling.
Access-readiness checklist
Use this before you order material. Use it to gather the dimensions an installer needs for a site review.
The route in
- [ ] Where will the delivery truck park, and can a crate or A-frame be moved from there to the house?
- [ ] Is there a covered, dry staging area at least as long as the panels, such as a garage bay?
- [ ] Measure every door on the route: width, height, and swing clearance.
- [ ] Note every turn. Can a 10-foot-long object on edge make the turn at that hallway or landing?
- [ ] Stairs: width, headroom at the top and bottom, landing size, and whether the stair turns.
- [ ] Elevator (condos and commercial): interior height, diagonal and door width. Many won't take a full-size panel at all.
The room
- [ ] Is there floor space to stand a panel upright and turn it to face the wall?
- [ ] Is the ceiling high enough to tilt a panel into position?
- [ ] Where will cutting happen? Long straight cuts are typically made with a rail cutting system on a flat, supported table, often in a garage.
- [ ] Is there protection for floors, walls and finished trim along the route?
If the route fails
- [ ] Smaller formats from the same line (e.g., 30 × 60 in., or 1000 × 3000 mm)
- [ ] A layout with planned seams so pieces can be cut before entering
- [ ] Another path (a window opening or a different door), which is sometimes possible and should be evaluated by the installer
Wall and floor preparation: flat is not the same as level
Flat means the surface has no significant humps or hollows. It's checked with a long straightedge. Level means horizontal, and plumb means vertical. A wall can be perfectly plumb and still have a hump at a stud or a dip at a drywall seam. The Ceramic Tile Education Foundation explains these as separate checks.
Setting-material manufacturers publish a flatness requirement for gauged porcelain panel substrates of no more than 1/8 inch in 10 feet and 1/16 inch in 24 inches, measured from the high points. Custom Building Products' panel guide publishes these figures. CTEF gives the same tolerance for tile with an edge of at least 15 inches.
That tolerance is tighter than many framed walls deliver. Panels need it for three reasons:
- A thin, rigid sheet the size of the wall can't follow humps and hollows the way small tiles can.
- Installation guides call for mortar on both the wall and the panel back, collapsed into a continuous bed. Voids weaken the bond and leave hollow spots that can crack under impact.
- Lippage between adjacent panels shows under raking light.
Wall preparation can mean shimming or replacing framing, new backer board, or skim coats or patching products approved by the setting-material manufacturer. Sometimes the wall is fine as it is. The point is that wall prep is a real scope line, and it should be priced as one.
Floor preparation and movement
For a kitchen, entry, basement or bathroom floor, document both the existing surface and the supporting assembly. A flatness survey identifies high spots, hollows and transitions. The correction might involve approved grinding, patching or an underlayment, but it must suit the substrate, moisture conditions, required bond and permitted floor build-up. A self-leveling product has its own preparation and thickness limits.
Wood framing and subfloor panels need a stiffness and fastening assessment. Concrete may have cracks, joints, moisture or structural movement to address. Neither extra mortar nor an uncoupling layer automatically corrects a deficient structure.
Crack treatment and movement joints are different details. For example, Custom's FractureFree data sheet excludes vertical-movement cracks and says not to bridge existing expansion, control, construction, cold or saw-cut joints. A membrane must be used within its own limits; it is not blanket permission to tile across joints. Keep the required perimeter, structural and field movement provisions in the plan.
Before pricing a floor, identify its intended use, tile finish, transitions, any heating system and work needed underneath. See large format tile floors. Floor project availability is confirmed during review.
Waterproofing: tile and panels are finishes, not the barrier
Porcelain has very low water absorption, which is why it's easy to clean. It doesn't make a shower waterproof. Schluter's shower-system guidance explains that tile and grout joints need a separate waterproofing system. Water reaches the wall through joints, sealant, cutouts and fixture penetrations. The barrier behind the panels is what keeps it out of the framing.
That barrier is usually one of these:
- a liquid-applied membrane (e.g., LATICRETE HYDRO BAN, MAPEI Mapelastic AquaDefense),
- a sheet membrane, or
- a waterproof board system (e.g., Schluter KERDI-BOARD),
typically tested to ANSI A118.10, and tied into the shower pan, drain, niches and curb. Membrane manufacturers describe a flood test before finishes go on.
Two layers, two responsibilities
When a designer, builder or homeowner documents a panel shower, it helps to draw the assembly as two separate layers:
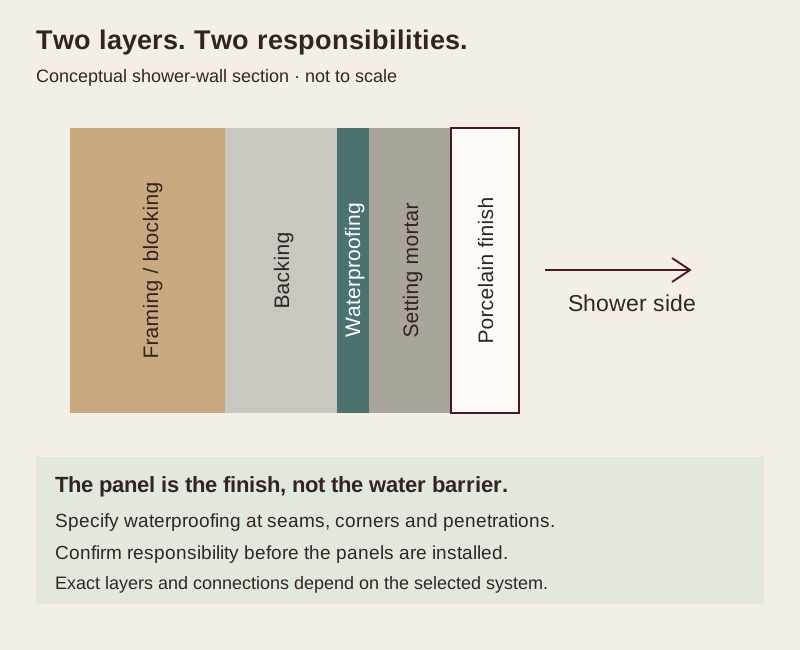
Label on the elevation:
- Waterproofing system: product, who installs it, flood test, how it ties into the pan, niche and curb.
- Panel layer: product, actual size, seams, cutouts, edge and corner details, sealant locations.
- Penetrations: each valve, head and niche, dimensioned. The waterproofing and the panel both have to treat them.
A panel shower quote that lists the panels in detail but doesn't name the waterproofing system is missing half the assembly.
Seams, movement joints, corners and sealants
A panel wall has fewer joints, but it still has joints:
- Panel-to-panel joints. Setting-material manufacturers set minimum joint widths for gauged panels, typically 1/16 inch to about 1/8 inch (2–3 mm) for interior walls. Joint filling does not replace proper bonding behind the panel.
- Movement joints. TCNA's EJ171 guidance calls for movement joints at perimeters and changes of plane: inside corners, where wall meets floor or ceiling, and where panels meet other materials. Large fields also need movement joints spaced for the exposure and system. In a shower, the inside corners and the wall-to-floor joint get a flexible sealant, typically 100% silicone, instead of grout.
- Outside corners. You can choose a mitered corner, a metal or PVC profile, or a finished edge. A miter shows the most continuous pattern but leaves a precise, sharp porcelain edge. A profile protects the corner and adds a visible line.
- Sealant is maintenance. Silicone joints are where cleaning attention and eventual re-sealing go. They are not a defect.
Niches, benches, penetrations and exposed edges
Every hole in a panel is cut on site or by a fabricator. Manufacturer and setting-material guides consistently call for:
- Relief at inside corners. Interior cuts get drilled or radiused corners. Laminam specifies a hole of at least 5 mm radius at the corner of L-shaped cuts.
- Careful drilling methods. For example, drill pilot holes at the corners of an electrical box cutout, and never use a hammer drill.
- Support during handling. A panel with large cutouts is weaker and needs support until it's bedded.
Before cutting, decide:
- valve, head and body-spray locations (final, not approximate),
- niche approach: wrapped in panel, lined in a contrasting material, or replaced by a ledge,
- bench construction and top material,
- edge finish wherever a panel ends in view.
Vein alignment and bookmatching
Marble-look panels have a direction and, often, a defined layout. Some products come in bookmatched sets, where adjacent panels mirror each other. Manufacturers publish limits on how exact that is:
- Laminam's thicker-slab furnishing guide discusses graphic variation and a 3 cm bookmatch tolerance; confirm the selected wall product's own allowance.
- Stonepeak's bookmatch guidance describes product-dependent trimming. Confirm the selected collection's edge condition and usable size.
- For any brand, confirm lot, shade and matching expectations with the supplier before ordering.
Practical steps: order everything at once, inspect panels and labels on delivery, lay out or photograph them in sequence, and agree on the match before anything is cut.
Layout, cuts, waste and replacement
Ordering large tile: area is a starting point
Suppose a shower has 88 square feet of wall and uses nominal 24×48 tile. For a hypothetical 10% allowance chosen only for this example, the coverage target is 96.8 square feet. At a nominal 8 square feet per whole tile, rounding up gives 13 tiles, or 104 nominal square feet.
That calculation does not establish that 13 tiles fit the actual cut plan. Actual dimensions, orientation, pattern, joint widths, broken pieces, offcut reuse and spare stock can change the quantity. Suppliers may sell by whole box, so the final order also rounds to the product's packaging. Ten percent is an illustration, not a recommended allowance for every project.
A panel order uses a different approach: allocate each required piece to whole panels using usable dimensions and pattern direction. The example below shows why area alone is insufficient.
Seam-planning example (hypothetical)
This is an illustrative example, not a completed project. It uses the published actual size of a nominal 60 × 120-inch panel (59.06 × 118.19 in.).
The shower: a three-wall alcove. Back wall 60 inches wide, two side walls 36 inches deep, panels set to a height of 96 inches. The glass is on the open side.
Area to cover:
- Back wall: 60 × 96 = 5,760 sq in.
- Side walls: 2 × (36 × 96) = 6,912 sq in.
- Total: 12,672 sq in. = 88 sq ft
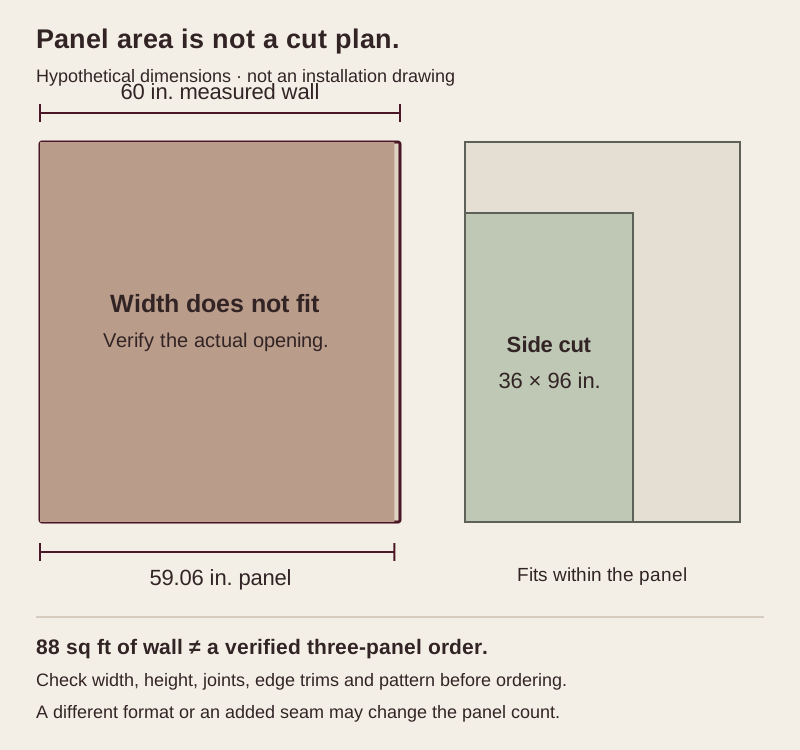
Fit check before panel count:
- Each 36 × 96-inch side-wall piece fits within a 59.06 × 118.19-inch panel, leaving strips whose usefulness depends on the remaining cuts and pattern.
- A measured 60-inch finished opening does not fit one 59.06-inch-wide panel. Do not assume mortar and side panels will reduce it by the right amount.
- Resolve the back wall with a wider product, a deliberate seam arrangement or verified finished measurements. Corner joints, trimming and pattern matching also need allowance.
Area comparison, not an order: three panels contain about 145.4 sq ft, compared with the 88 sq ft of wall area above. The difference is 57.4 sq ft, about 39% of that purchased area. This does not establish three panels as sufficient, and it is not a verified waste factor. A final cut plan may require a different quantity.
Seams: the two inside corners need their specified flexible joints. The back wall may also need a field seam. Place any field seam deliberately, using the actual material size and desired pattern, before counting panels or adding a spare.
The same arithmetic applies to fireplace and feature walls. A wall wider than one panel will have a seam, so place it on purpose.
Replacement is a real consideration
A cracked tile can be swapped. A damaged panel means replacing a full wall section. That's another reason to keep an attic-stock panel from the same lot, if the budget and storage allow. Check the material warranty and installation agreement separately, including how each handles breakage and replacement labor.
Installing over an existing surface
Panels can sometimes go over existing tile, masonry or drywall. The conditions are specific:
- The existing surface must be sound and well bonded. Loose or hollow tile has to come off.
- It has to meet the same flatness tolerance as any other panel substrate.
- It must be cleaned and prepared by the method the setting-material manufacturer approves, such as abrasion or a specific primer.
- Approvals are narrower in wet areas. One major setting-material manufacturer limits its primer method for existing tile to intermittently wet surfaces and asks installers to contact it about continuously wet ones. The exact primer, mortar and wet-area assembly need approval together.
- Added thickness changes trim, valve extensions and how edges meet adjacent surfaces.
In a shower, covering old tile also covers whatever waterproofing is or isn't behind it. Removing the old finish may be needed to establish a suitable assembly; that decision belongs in the scope.
Fireplaces
Fireplace panel work is governed by the appliance first. Factory-built fireplaces must be installed according to their listing, and their manuals set facing-material and clearance rules. Masonry hearths and trim require review under the rules adopted for the project address. Confirm panel, backing and setting-material suitability with the appliance and material manufacturers; decorative facing is not firebox lining. Our fireplace page covers layout, returns and hearth details.
Cleaning, maintenance and repair
- Routine cleaning: follow the product and finish-specific care instructions. Laminam recommends neutral detergent for ordinary cleaning and rules out hydrofluoric acid; Infinity's precautions rule out abrasive materials.
- Scratch and chip resistance: high, not absolute. Stonepeak's warranty does not warrant against scratches, chips or wear. Laminam rates its polished finish less resistant to surface scratches than its other finishes.
- Sealant joints: clean them with neutral cleaners, and plan on eventually re-sealing silicone corners.
- Repairs: small chips at edges can sometimes be filled cosmetically. A cracked panel usually means replacement, which is why spare material matters.
Buying panels in Kansas City
Who supplies the material? In the Kansas City area, porcelain panels are sold through showrooms, tile and stone distributors, and fabricators. Supplier purchasing arrangements differ; ask whether the showroom sells directly or works through a dealer or fabricator. Settle early whether you're buying the material yourself, through a designer or builder, or as part of an installation proposal. Whoever buys it should also decide who receives the delivery, inspects it and carries the breakage risk.
Do you need a permit? Ask the building department responsible for the property address, describing both the finish work and any plumbing, structural or fireplace changes. Kansas City, Missouri, Overland Park, Olathe and unincorporated county locations can fall under different authorities. A finish-only inquiry is not enough to assess a larger remodel.
Choosing an installer and comparing quotes
Qualifications in this field are specific and easy to blur:
- CTEF Certified Tile Installer (CTI): an individual certification by third-party evaluation.
- Advanced Certifications for Tile Installers (ACT): individual specialty certifications, including one for Gauged Porcelain Tile and Gauged Porcelain Tile Panels/Slabs.
- NTCA membership (trade association) and NTCA Five Star (company accreditation) are different things.
- Manufacturer training applies to that manufacturer's products and methods.
If a credential matters to you, ask who holds it and look it up. CTEF publishes a searchable installer directory.
Quote-scope checklist
When you compare proposals, check that each one addresses:
- [ ] Tile or panel product, actual size, thickness, finish and quantity, and the layout the count is based on
- [ ] Tile pattern and joint width; whole-box rounding or whole-panel cut plan
- [ ] Who supplies, receives and inspects the panels, and who bears breakage risk
- [ ] Demolition and disposal
- [ ] Wall or floor preparation and the flatness target
- [ ] Floor structure, transitions, cracks and existing joints where applicable
- [ ] Waterproofing system, installer, and flood test
- [ ] Cutouts (valves, heads, niches, outlets, firebox) and corner and edge details
- [ ] Movement joints and sealant type
- [ ] Shower floor material and drain (if applicable)
- [ ] What's excluded: plumbing, electrical, glass, fireplace appliance, painting, permits
- [ ] Access assumptions: crew size, route, staging, cutting location
- [ ] Spare panel or attic stock
Two quotes for "a porcelain slab shower" can describe very different jobs. This list makes them comparable. Our cost and planning guide explains how each line affects price.
Where to go next
- Large format tile showers: wall-size examples, tile grids, niches and the relationship between floor slope and drain layout.
- Large format tile floor requirements: flatness, structure, mortar contact, movement joints and transitions. Floor project availability is confirmed during review.
- Porcelain slab showers: full-height shower walls, seams around the valve and niche, and how to assign waterproofing responsibility in the scope.
- Porcelain slab fireplaces: surrounds, chimney breasts and full fireplace walls, planned around the appliance's own requirements.
- Porcelain feature walls: bookmatched and continuous walls for homes and commercial interiors, with lighting and fixtures planned in.
- For designers, builders and architects: what to send for an installation proposal and how to split scope between trades.
- Cost and planning guide: what drives price, with worked material arithmetic.
- Infinity, Laminam and Stonepeak compared: sizes, thicknesses and documentation for selection and installation planning.
Frequently asked questions
Is 12×24 tile large format? Yes for the substrate-flatness threshold discussed here: it has an edge at least 15 inches. It is not a full-size porcelain panel. Use the exact product's installation documents for the other requirements.
Can I use a 50% brick pattern? Check the product and applicable standard before choosing it. Long-tile curvature can become more noticeable at a half-tile offset. The offset and mockup requirements are explained in what counts as large format.
Can a large tile shower use a point drain? A point drain can require cuts that follow changes in slope. A compatible linear-drain design may allow a single plane. The drain, waterproofing, floor tile and complete slope layout need to work together; see large format tile showers.
Are porcelain panels grout-free? No. They have far fewer joints, but adjoining panels still meet at narrow joints, and inside corners and changes of plane get flexible sealant.
Are porcelain panels waterproof? The porcelain has very low water absorption, but a panel installation isn't a waterproofing system. Showers need a membrane or waterproof board system behind the panels.
Can I use the same panel on the shower floor? Sometimes, if the product is documented for floors. But a large panel doesn't easily follow the slope a shower floor needs. Panel showers often use a linear drain with a single-plane floor, or a different floor material.
What's the difference between a 24×48 tile and a panel? Under ANSI A137.3, a panel has at least one square meter of face area, about 10.8 sq ft. A 24×48 is 8 sq ft. Beyond the definition, panels change the handling, ordering and layout of the job.
Do larger panels cost less to install because there are fewer pieces? Not as a rule. Less grouting does not remove the costs of handling, substrate correction, precise cutouts and whole-panel ordering. See the cost guide.
Can panels go over my existing tile? Sometimes, on sound, flat, properly prepared tile, within the setting-material maker's limits. Wet-area conditions need specific review; do not assume an approval for a dry wall also covers a shower.
How long do the sealant joints last? It depends on the product, exposure and cleaning. Silicone at shower corners is a maintenance item that eventually gets re-sealed.
Is a 6 mm panel strong enough? ANSI A137.3 includes strength criteria for certain nominal thickness ranges, including 5–6.5 mm products. Thickness alone is not approval for every application. Check the selected product and complete assembly; suitable support and bonding matter.
Can you match a panel if one breaks years later? Possibly, but not reliably. Shades and production lots vary and products are discontinued. Keeping a spare from the original lot is the most dependable plan.